tiistai 21. helmikuuta 2012

WWII Aerial Game Test I


Years ago we hugely enjoyed playing WWI aerial combats with Canvas Eagles and even played a campaign for the whole war where one weekly game portrayed one week's activity -yeah the campaign lasted several years!

Since then we've kinda wanted to have similarly enjoyable games with WWII aerial combats and over the years have tried to locate a suitable system. I seem to recall Aksu having found a Canvas Eagles derivative from Rome (perhaps it was called "Fatto!") that we tried but it simply didn't work.

We currently have a couple of games that seem to work rather well but not everyone had played them so as Aksu wanted to give them a test we decided to play the same scenario with both Scramble and Sturmovik Commander.

Unfortunately Mr H who was most familiar with Sturmovik Commander didn't show up so the game took little bit longer than we expected and thus we didn't have time to check the Scramble too.

Our main interest is local combats so naturally the test game was between Finland and the Soviet Union, four SB-2 bombers escorted by two I-16 Ratas against two Brewsters and two Morane Saulnier 406s.


We used just the basic rules and while the system worked rather well, the fighters differed extremely little from one another. And I kinda felt that the system seemed to have worked better the previous time we played it. Anyways, it is basically impossible to beat the value for money the game has since it IS a good system and it doesn't cost a thing as you can download it from the above link for free.


Janne
(Played: Feb 13th. GM: Aksu. Finns: Eero, Janne. Soviets: Aksu, Chris, Mr V.)

sunnuntai 12. helmikuuta 2012

Battle of Belmont


Let's start with a couple of overviews of the table.


The Union advances a bit. Mostly through a swamp.

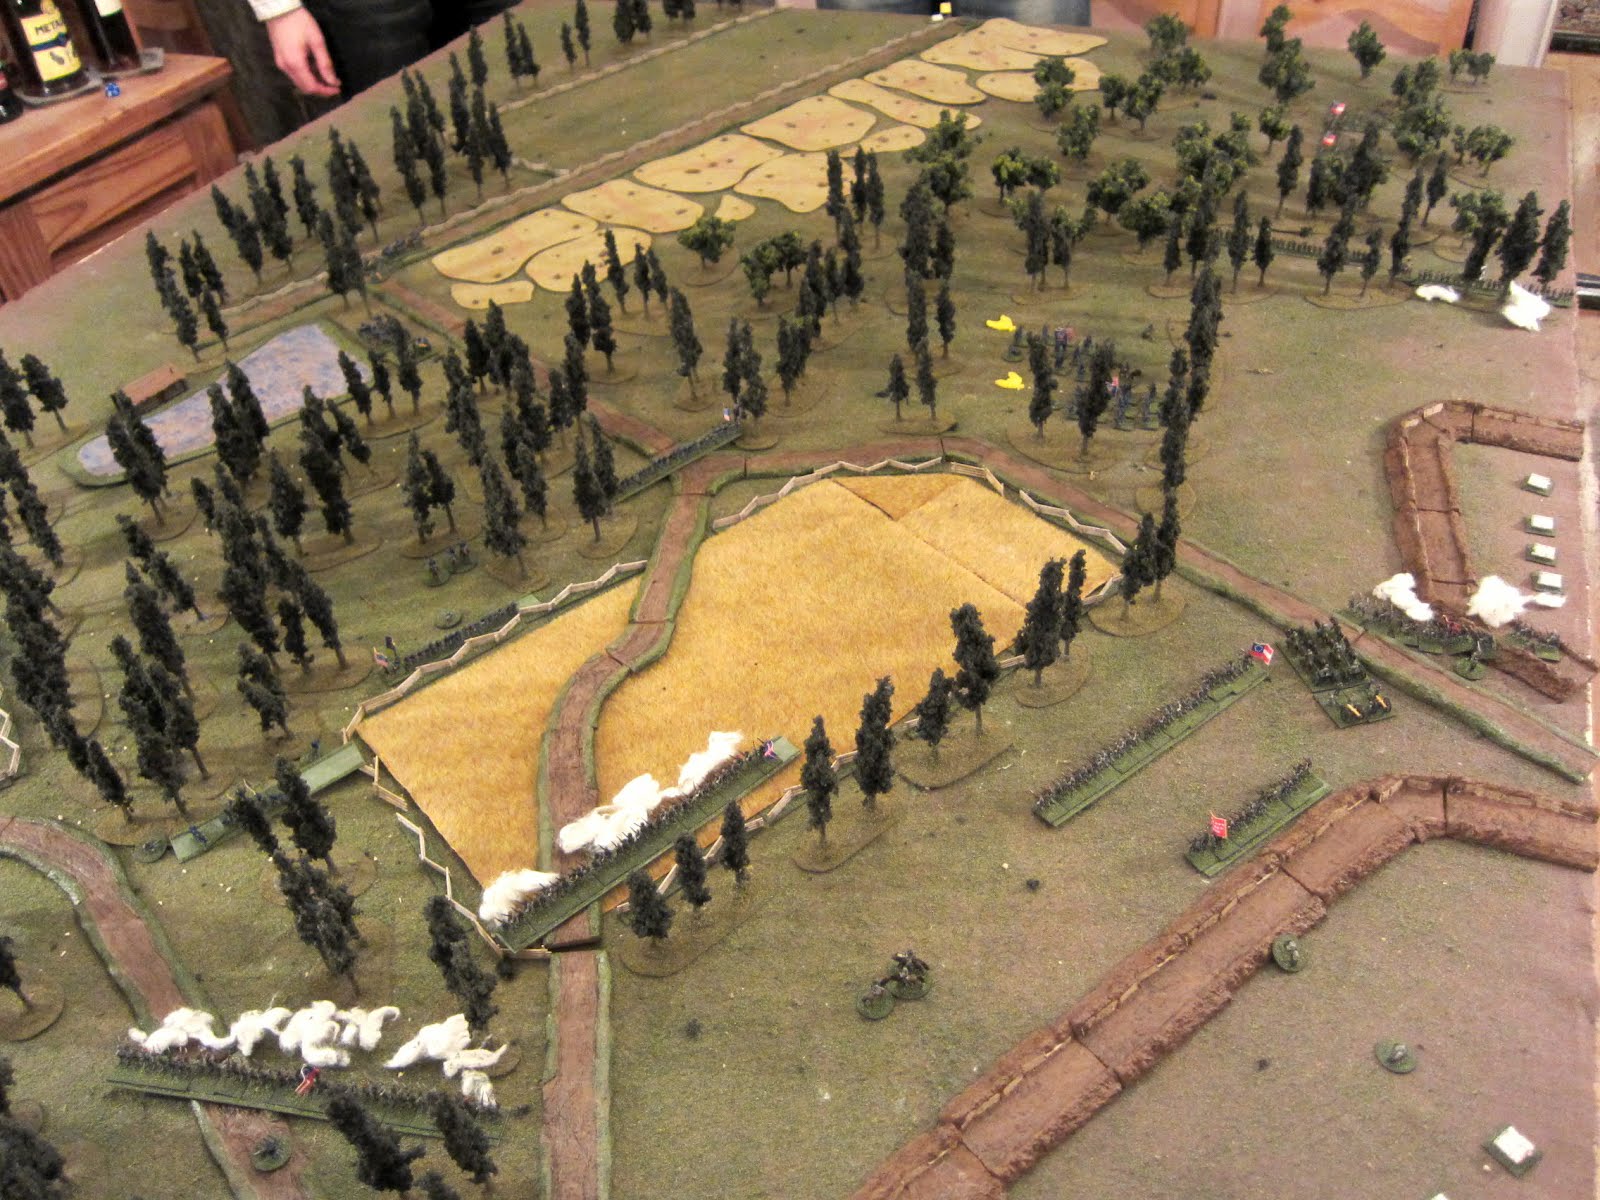
Confederates in their camp...

...is a ruse. Some of those regiments are actually in the cornfield hidden from the Union troops because of a small raise....

...so we have an ambush.

And using Wellingtonesque tactics, a charge goes nicely with an ambush.

With one section damaged the Union artillery limbers up and relocates quickly while their infantry gets into firing distance...

...routing one Confederate regiment while others just retreat.

Same situation. The new movement trays REALLY speeded up the game.

Union troops angrily chase the retreating Confederates...

...who move rather slowly but at least manage to rally the routing regiment.

Some fighting in the cornfield.

And some retreating.

The 2nd Union brigade gets into firing distance of the smaller part of Confederate camp.

First retreating regiment manages to get back into camp.

Union presses on towards the main camp and storms the smaller one in one sweep!

Confederate guns escape to the bigger camp while the infantry regiment tries, in vein, to repel the union troops. Also one unlucky regiment tries to find a way to get into the camp all the while being shot to pieces by Union troops.

Union gets their artillery back to front -this doesn't look good.

Trying to maneuver out of the artillery's firing arc.

Union regiments creep closer and open up.

Plenty of fire and smoke but little effect. Confederates had to this point of the game rolled at least eight "2's" while shooting. But this was soon to change to 8's, 9's and 10's.

half of the Confederate reinforcements arrive by ferry and start flanking the Union occupied part of the camp.

Since outnumbered and with little hope of overrunning the camp, Union decides to skedaddle.

Right Union brigade retreating in good order...

...while the left is still duking it out.

Confederates swiftly follow and engage and around this time Union got the heavier casualties marker.

The whole left Union brigade is routed and one regiment in the right one is pummeled into oblivion.

Confederates surge into close combat. The Union left brigade's regiment manages to win the melee even if it was routed and got the enemy into flank -go figure. On the Union right flank the already mauled regiment got beaten but the regiment next to it managed to give the Confederates a good trashing.


Thanks to Aksu, Janne, and Mr V for coming over yesterday and gaming the Battle of Belmont, Ulysses S. Grant's first outing as a Union general ... well, he might want to reconsider those future White House ambitions!

Grant's goal was to storm and burn Camp Johnston, which was being used to stage Confederate troops along the Mississippi. As the long Union march column approached the Confederate breastworks, it began to deploy along the road in preparation for the march through the swamp and forest towards the camp. This was a cautious approach (as opposed to continuing as far as possible along the road), but as the Union cavalry pickets discovered the Confederates had a surprise prepared. Hidden along a slight rise in a large cornfield, three regiments of CSA Tennessee Militia launched themselves onto the surprised Illinois Cavalry, which soon withered under the weight of numbers, and then drove off the Union artillery which had been approaching along the road.

This changed the Union plan, so that McClernand's main force began to march obliquely towards the cornfield while Dougherty's smaller supporting brigade deployed on the left and began to make its way towards the Confederate redoubt. The overzealous Confederates found themselves in a bit of a pickle, pinned to front and without room to maneuver. Fortunately for them ... I misremembered a rule and the pinned regiment was allowed to "voluntarily break away", starting the long process of the Confederate retreat towards the camp, which proved singularly uneventful in the face of some truly bad dice rolling. Things began to swing in the Union's favor as Dougherty's 7th Iowa stormed the Confederate redoubt protecting the flank of the main camp, routing the 2nd Tennessee and driving off the CSA artillery.

McClernand's regiments were also in position along the wood line to launch their assault on the main camp, just as Confederate morale began to falter under the weight of heavy casualties ... and then the Confederate reinforcements began to arrive! Brought in by steamer, two brigades of CSA infantry began to deploy on the flank of Dougherty's men, who were still jammed into the redoubt trying to redeploy. As one brigade pinned Dougherty's men, the other began to advance towards the Union landing point, and the entire Union army was ordered to break off the attack and retire. McClernand's men were able to do so in relatively good order, although they suffered heavy casualties as the newly invigorated Confederates left the camp to pursue them. Dougherty's men, however, caught between opposing forces and unable to redeploy, did some "voluntary breaking" of their own and streamed away in confusion.

As the Union was unable to storm the main camp, while the Confederates were able to inflict heavy casualties on the Union, the game was a solid win (3-0) for the CSA.

I was perhaps a bit heavy handed in making the Tennessee Militia somewhat too strong and resilient, and allowing the "ambush" to catch the Union so unprepared (and at close range), however the Union plan also unwittingly played into the Confederate strengths. Add to this some lucky rolls for reinforcements, and the game was actually much closer than it looks. Given another few turns, or a bit more historically brittle opposition, the Union could have stormed the camp. All in all, the game played fairly quickly and was certainly eventful!


Wikipedia entry of the battle

Janne (afteraction report by Chris)
(Played: Feb 6th at Chateu d'Tenwolde. GM: Chris. Confederates: Janne, Mr V. Union: Aksu, Chris.)

keskiviikko 1. helmikuuta 2012

Battle of Burgos

It has been a long while since we played napoleonics the last time and it probably has something to do with our 1808 Russo-Swedish War project too. Like battle weariness coupled with the fact that not everyone in the club is into the period...

Aksu had bought Too Fat Lardies' Le Feu Sacre III -rules and painted some 15mm Spaniards so he wanted to give both a try so he put together a scenario for the Battle of Burgos. There was no doubt about the outcome, the Spaniards were going to get their heinies kicked. Hard. No probs there though -the battles definitely don't have to be fair and even to be enjoyable. Quite the opposite.

Spaniards deployed for the battle. Since the actual commander had fleen the forces were commanded by a count, or some other noble, who had no military experience at all. On the right side of the road you have crap de la crap, Spanish militia which is a bad troops as can be. On the left side of the road are Spanish guards supported by regular infantry -these are more or less the quality of regular Frenchies. On both sides of river there's a regiment of not-so-trained light cavalry. Excelente!

Froggies arrive using blinds. Took them a couple of turns to get this far from the board edge -these brigade blinds are supposed to quicken the play as you don't have to fuss with fiddling of the miniatures. Spaniards could also have been deployed like vise but we kinda forgot that...

Blinds can be spotted by enemy commanders but they are notoriously bad at this -units in the open within artillery range are probably not going to be recognized so you can't even tell whether the blind is actually a dummy without any troops or it if contains cavalry, infantry or both. Fog of war and all that. Hrmph!

Trying to avoid the historical events by deploying the militia into squares...

...which wasn't in vein as the blind on French left flank contained three regiments of medium cavalry. Luckily the Spaniard light cavalry is absolutely inferior to them but now also heavily outnumbered. Fleeing seems like the most valid option, but unfortunately they have hold-orders so they are waiting for a sound trashing.

Fearing the couple stands of Spanish artillery (the only unit type eligible to shoot in LFSIII) the French infantry deploys in the forest.

Surprise of the surprises! Against supported attack by French dragoons led by their commander the Spanish cavalry manage to get a result where they both combatants retreat a bit without casualties. Ay ay ay! Muchos cohones!

Infantry vise the Spanish artillery manages to score, against all odds, a couple of hits to some of the numerous French battalions, but nothing that has any effect on the game. The Frenchies advance out of the forest and especially against the unlucky militias in squares.

Caramba! Francés de infantería.

While the three French cavalry regiments drive off the hapless Spanish cavalry, the French infantry gives a good ol' whupping to one square making it flee and, as the militia is brittle, the remainder join in. The last remaining French blind contains two more regiments of dragoons -things are looking might grim for our heroes!

The remaining French infantry also start closing in on the better quality Spanish troops. Ah, and the Spanish artillery (previous in the middle of the formation, now suddenly in the right flank) is forced to flee by flanking attacks.

The militia is rallied for a while, but new attacks send them running for the hills again. The other Spanish units are now also engaged and thus pinned.

The most beaten militia is allowed to flee while the others are rallied.
Elsewhere the Spanish guard is routed by flanking attacks.

One dragoon unit routs three battalions by flanking attack and the subsequent breakthroughs leaving one Spanish battalion to defend the field in addition to one cavalry regiment on the left flank on the other side of the river. The Spaniards are soundly beaten -a historical result even if our guard units didn't get to put up a proper resistance.


The system uses unit cards to see which brigade is acting. Each commander also rolls initiative point dice -being in the opposite ends of spectrum French had a positive modifier for this while the unlucky Spaniards a negative one. Quite often the card system meant double actions for one side as they got their card last from one deck and then first from the next turn's deck -never that good a thing for a game.

Combat resolution and results seemed a bit foggy and cumbersome. Had plenty of fleeing/routing and surprisingly little damage. Undecided if this is actually a good or a bad thing.

Some interesting concepts in the rules that look promising when you read the rules but most of them didn't really seem to work all that well in practice. The one I thought was the best was one that made the rallied units permanently shaken -no more infinite rallies with no adverse effect on the morale! British style of rule writing (sloppy or non-existing editing) don't really help using the rules.

The rules are supposed to be quick play rules but even if you take into account all the problems involved in the first game I thought that the rules were pretty darn slow.

Dunno if it was because of the lack of shooting but the worst part of the game was that it lacked the period feel. I think that in that aspect the game was probably the worst nappy game I've ever played and that also includes the few games of Piquet we played years ago. At least with Piquet the game flow was much better. Actually this experience was not that unlike other set of Lardies rules, TWaT, we tried out last fall -seemingly simple and sound in theory, but throughly rotten experience as a game.


Based on the experience from this game (and I don't mind losing, mind you, the Spanish defeat was a certainty from the first moment) the hype from the publisher seems like as inaccurate as can be:
"The result is a set of rules that is fast and enjoyable to play, but also captures to true feel of the period."

YMMV, butI think I'd rather have my teeth pulled than play with these rules again... :(


Wikipedia entry of the battle

Janne
(Played: Jan 30th. GM: Aksu. French: Chris, Mr V. Spain: Aksu, Janne.)